This is part of a series of checklists I am making available to you.
Click the "Printer-friendly version" link at the bottom of the page and feel free to print out as many copies as you like!
----------
Reed replacement checklist
version 2016/07/24
Items needed
___ Hammer
___ Reed removal pin
___ Reed removal spine
___ Brick or anvil
___ M1.4 tap
___ M1.4 screws
___ Reed wrench
___ Flush cut pliers
___ Drill press or Rotary tool with reamer bit
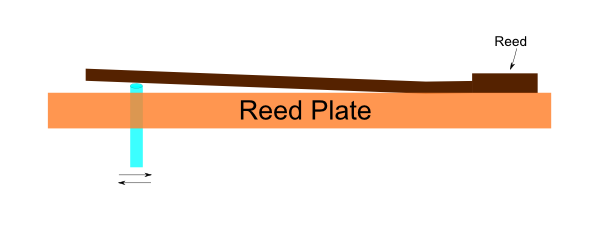
Remove bad reed
___ Identify bad reed
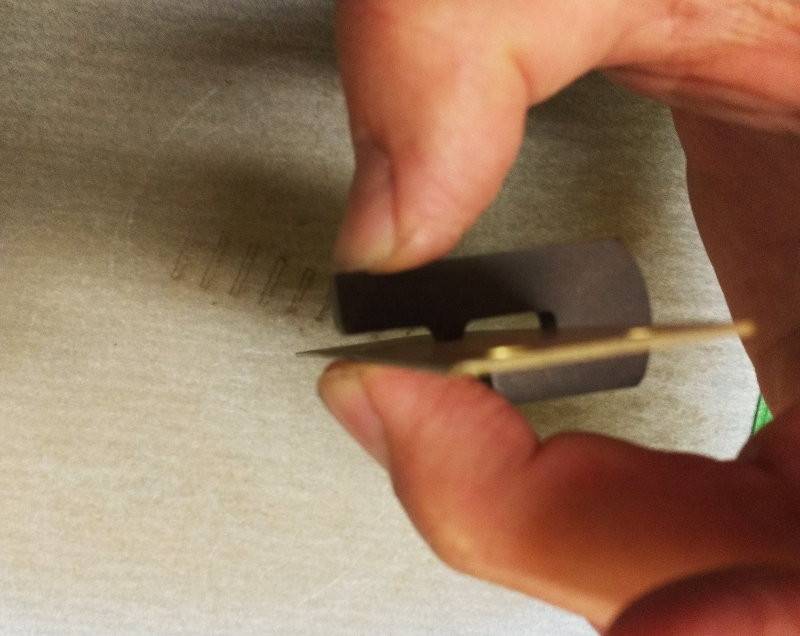
___ Place correct rivet head into reed removal spine hole (reed tip points away from spine)
___ Punch out rivet
___ Flip reed plate around and place on flat part of reed removal spine
___ Flatten hole using flattening pin
___ Tap hole using M1.4 tap. De-burr as needed
Prepare new reed
___ Obtain new reed
___ Enlarge rivet hole using drill press (1/16th inch bit) or rotary tool with reamer
___ De-burr as needed
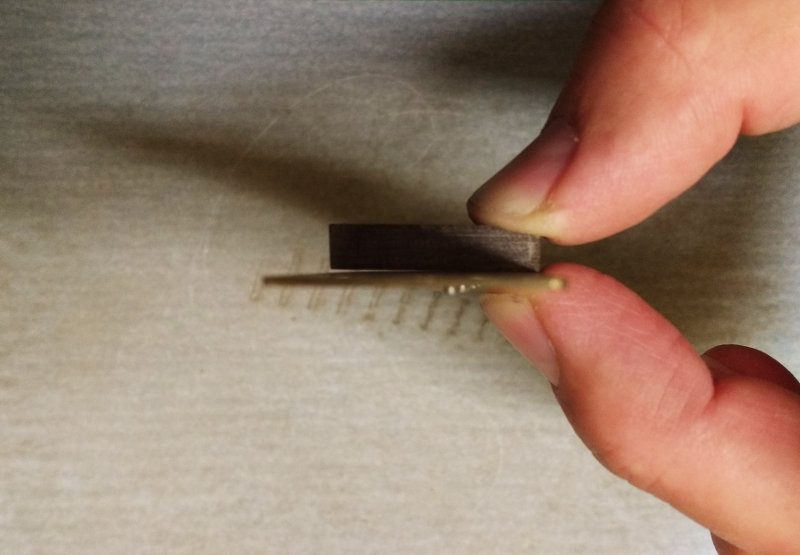
___ Flatten rivet pad using flattening tool and flat part of reed removal spine
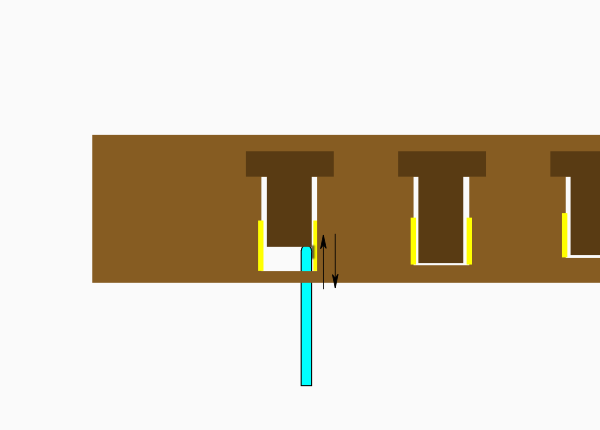
Install new reed
___ Position new reed into slot standing up and pinch it with your fingers
___ Insert M1.4 screw and tighten all the way
___ Loosen the screw very slightly
___ Look at a light source through the slot and align the reed
___ If the reed doesn't align, remove the screw, enlarge the hole in the rivet pad and repeat all the steps to prepare the reed
___ Pinch the base of the reed very tightly to hold the reed in place and tighten the screw
___ Re-confirm reed position and alignment
___ Snip off back of screw
___ Re-confirm tightening of screw
___ Re-align reed
___ Flat sand draw reed plate or sand down tip of screw in blow plate
Fix reed shape and tuning
___ Correct reed curve using pressure and counterpressure
___ Tune reed
This is part of a series of checklists I am making available to you.
----------
Convert Marine Band 1896 to screws checklist
version 2016-12-13
Items needed
___ Thin Paring knife
___ Drill press with 1/16 inch and 3/32 inch bits
___ Pliers (flush cut or needle nose)
___ M2 Tap and tap holder
___ M2 Screws and nuts
___ Clean sheet of 220 grit sandpaper taped to a flat surface
___ F tool
___ French Tuner
___ Wet towel to moisten fingers
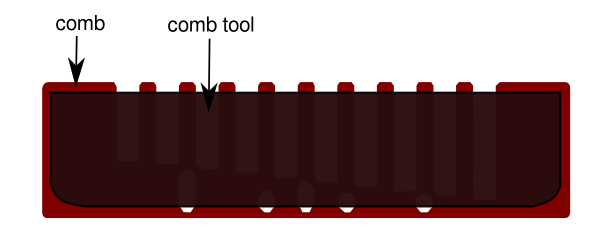
___ Replacement comb
___ Flat punch (optional)
Remove cover plates
___ Pry off covers using a paring knife
___ Gently remove nails from covers using pliers
___ Drill front cover plate holes with 3/32 in bit
___ Flatten back nail holes for aesthetic purposes (optional)
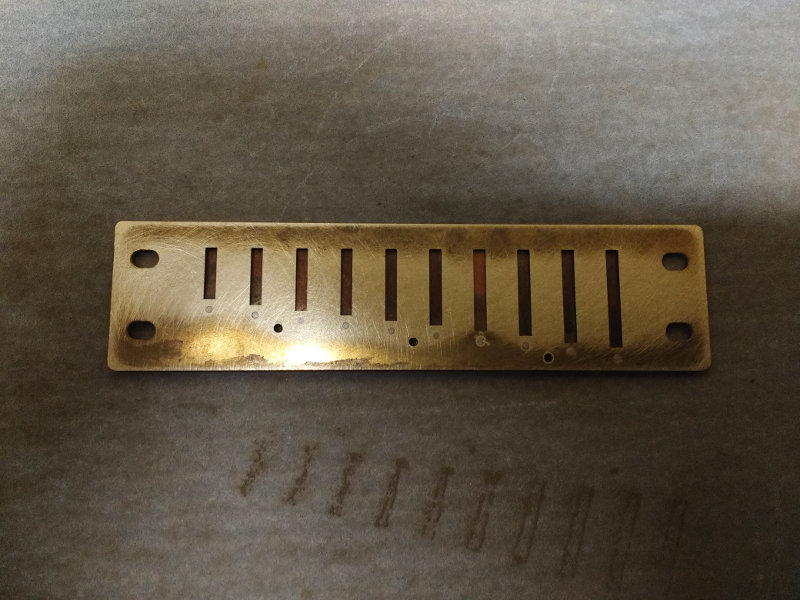
Remove reed plates
___ Insert paring knife between back of blow reed plate and comb
___ Advance the knife without prying up so as to lift up all three middle nails (only the three middle nails)
___ Remove nails using pliers
___ Insert knife between back of draw plate and comb
___ Advance the knife without prying up so as to lift up all three nails (only the three middle nails)
___ Remove nails using pliers
___ Place harmonica top(blow plate)-side-down onto drill-press surface
___ Drill through-and-through the three draw plate nail holes using a 1/16 inch bit
___ Remove the remaining nails on the sides of the reed plate using the paring knife and pliers
Prepare reed plates
___ Tap three 1/16 inch holes in DRAW plate with M2 tap
___ Flatsand the draw reed plate using 220 grit sandpaper and a flat surface
___ Enlarge the holes in the BLOW plate using 3/32 inch drill bit
___ De-burr the holes of the BLOW plate
___ Check and correct flatness of the BLOW plate using the French Tuner and the F tool.
Assemble the harmonica using screws
___ Gather both reed plates, both cover plates, five M2 10mm screws, two M2 nuts and a flat comb
___ Hold the comb with the long slots to your left
___ Pick up the reed plate that has all the rivet pads lined up at the front. This is the blow plate
___ Put the blow plate on the comb with the reeds on the inside
___ Put the draw plate on the comb with the reeds on the outside
___ Line up the plates and the comb so that you can insert the middle screw
___ Tighten the screw almost all the way. Keep it loose enough so that you can wiggle the plates and comb to align the other screws
___ Insert the two other reed plate screws
___ Align the reed plates and comb to your liking (press the tine-side down onto a clean flat surface to line everything up)
___ Tighten the screws using finger pressure
Install the cover plates
___ Place the top cover plate (with the numbers) into the groove on the top of the blow plate
___ Turn the harmonica over and place the bottom plate into the groove on the draw plate.
___ Line up the cover plate holes and insert a screw
___ Wet the tip of your finger and pick up an M2 nut
___ Place the nut onto the tip of the screw and tighten almost all the way
___ Align the cover plate holes on the other side and insert a screw and nut
___ Tighten both screws using finger pressure.
I use checklists. They help me do my work better and faster.
"A checklist is a type of informational job aid used to reduce failure by compensating for potential limits of human memory and attention. It helps to ensure consistency and completeness in carrying out a task." (Wikipedia)
I don't have a checklist for every task I do, I tend to make them up when I realize I keep repeating the same mistake. I also tend to revise some checklists quite often, incorporating new and better ways of doing things - just because I use a checklist doesn't mean I stop thinking. In fact, a checklist helps me come up with new ideas and incorporate them in my practice very easily.
There are two general types of checklists. The first is just a list. For example, you make a list of things you need to pack before going on a trip. Before you leave, you go through the list to make sure you haven't forgotten anything. This is generally called "Do - Confirm"
The second type is generally called "Read - Do" and it breaks down the steps of a task. It's meant to be read in sequence and each step of the task is performed before you move on to the next step.
I will be publishing some checklists in the coming weeks right here on my website. I hope you find them useful!
I won't publish every checklist I use. But I may make up some new ones to help those who prefer having a written guide when they try out a new task for the first time.
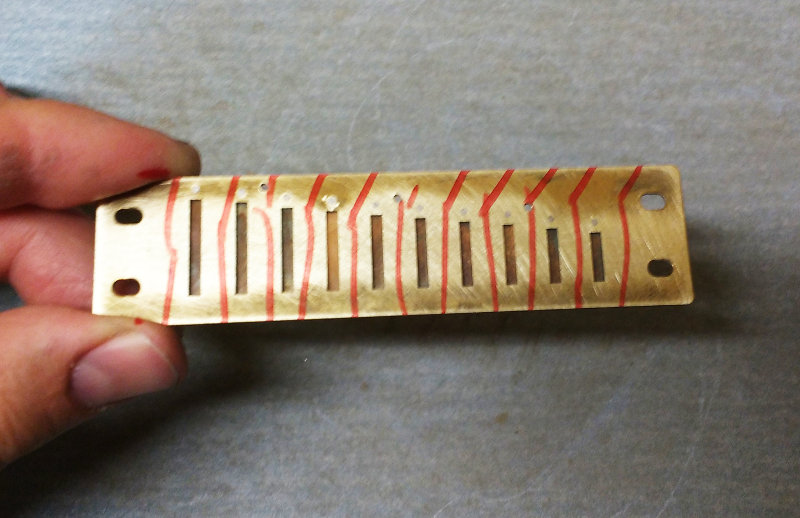
Flat sanding the draw reed plate is one of the easiest things you can do to improve a harmonica. It almost always works.
BUT... There are exceptions to the rule and harps from any manufacturer can fall victim. I came across two examples of this in one week.
If you begin to flat sand a draw reed plate and see this, STOP! Flat sanding won't fix this. The curve in the plate is too big. The F tool™ can handle this!
The curve is so deep that you cannot sand this down to make it right. Here is a view of the plate along with the French Tuner™ used as a reference. Can you see how much space there is in between the French Tuner and the reed plate? An air leak like this makes that harp feel really stiff!
I straightened the plate using the F tool in the usual manner.
Now, I may have overshot the mark and pushed the middle of the plate back too far. How can you tell? You can check with the French Tuner or you can use the flatsanding process to save some time.
Since the middle of the plate is nice and shiny if I go back and flatsand I may not see any problem. Everything will look shiny!
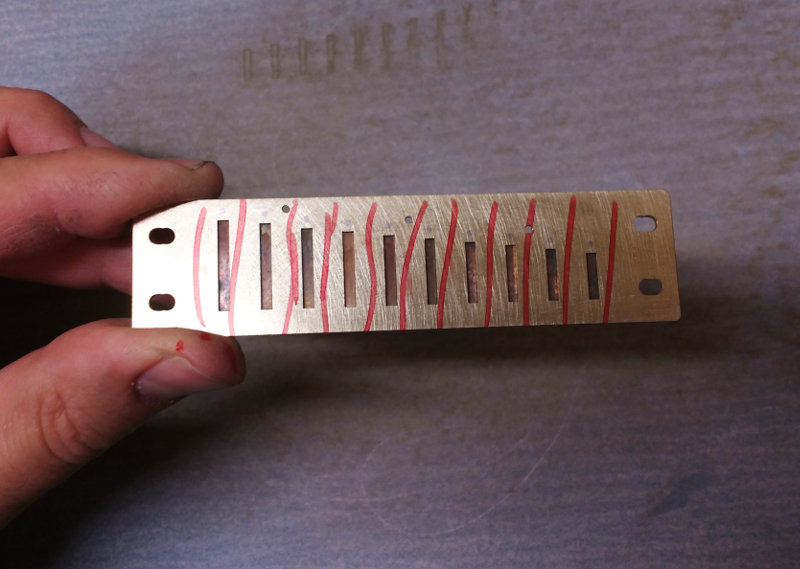
So I drew some markings across the reed plate. This will reveal any spots where I may have over done it.
Sure enough, I over did it as is shown by the red spot that remains after sanding.
I corrected that using gentle pressure with the F tool. I drew more red lines once again to be sure I didn't overshoot the mark once again.
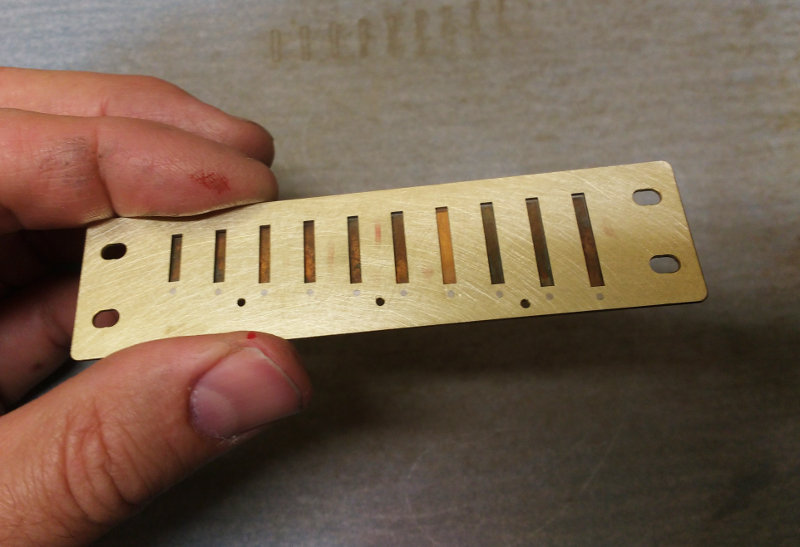
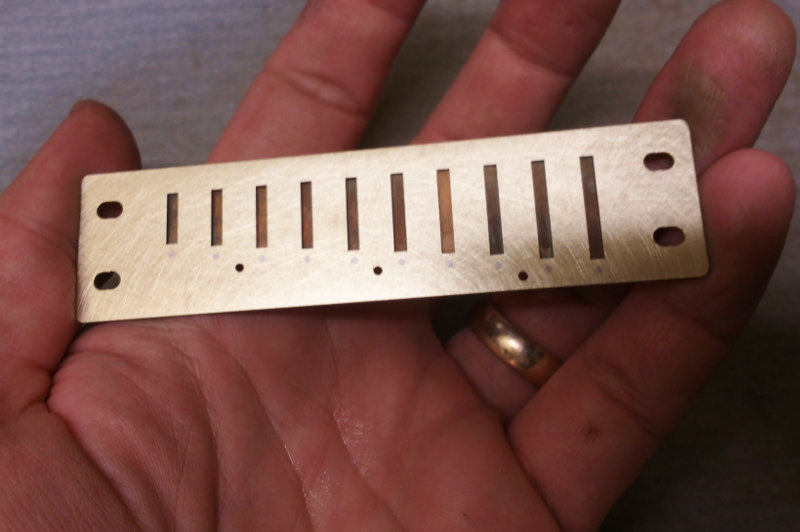
After a little flat sanding, every trace of the red lines are gone and that means the reed plate is now flat.
This made a very big difference in how well this harmonica plays!
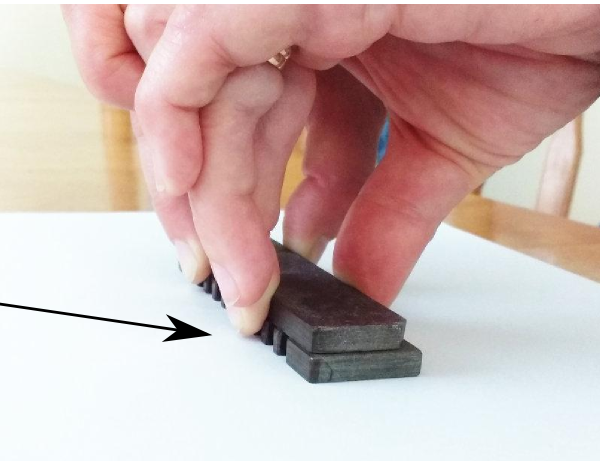
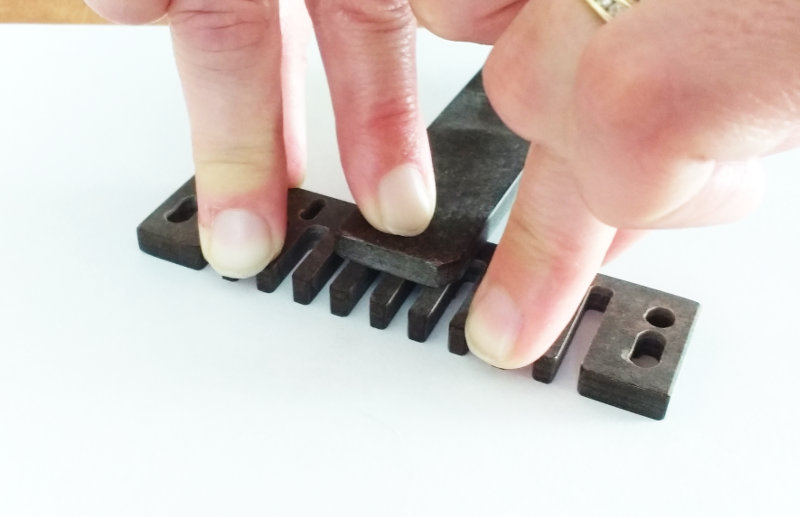
Here are some extra tips on how to get the best use of my comb tool™
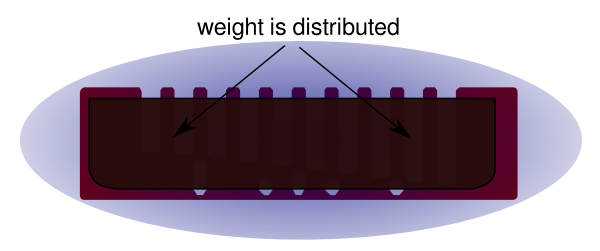
Hold the comb tool over the comb to distribute the weight of your fingers. Hold both the comb tool and the comb at the same time as you sand.
Make sure you don't rub the tips of your fingers on the sandpaper.
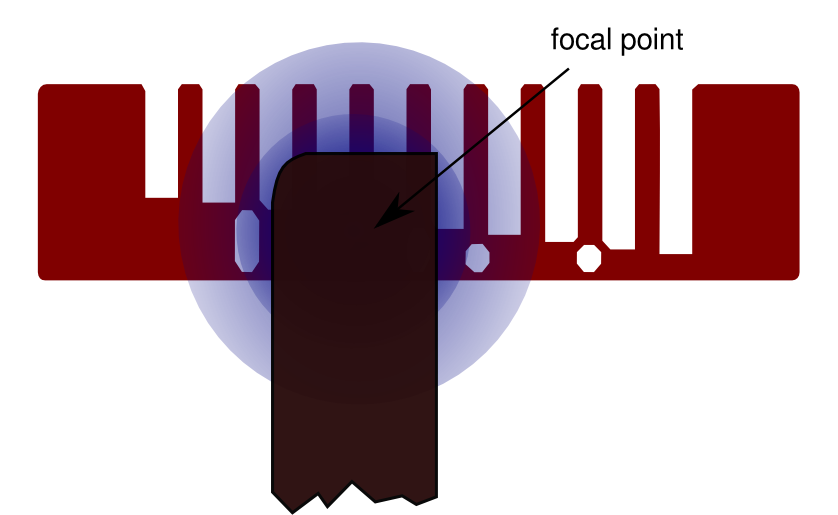
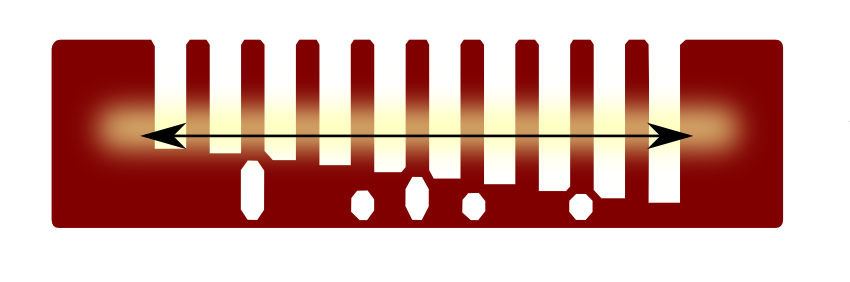
To sand down a bulge somewhere in the middle of the comb, find the focal point of the bulge and position the end of the comb tool over it.
Only cover the bottom half of the comb. Apply gentle downwards pressure as you sand. Re-check and repeat as needed.
Most of the sanding happens right under the comb tool. The farther away from the comb tool, the less material will be sanded away.
Positioning the tool like this prevents you from removing too much material at the tips of the tines because there is more material at the back of the comb than at the front.
To flatten a downward facing bow, sand down each side. Position the end of the comb tool over each side.
Flatten the left side and then do the right side.
Then do a quick flattening of the whole surface to even things out before you re-check.
Repeat the whole process as needed.
Position the tool closer or farther from the middle as needed.
One last thing...
Overworking things may build up a bulge in the very middle of the comb.
You may need to lightly sand down the very middle of the comb freehand, then flip it over and do a quick sanding of the whole surface.
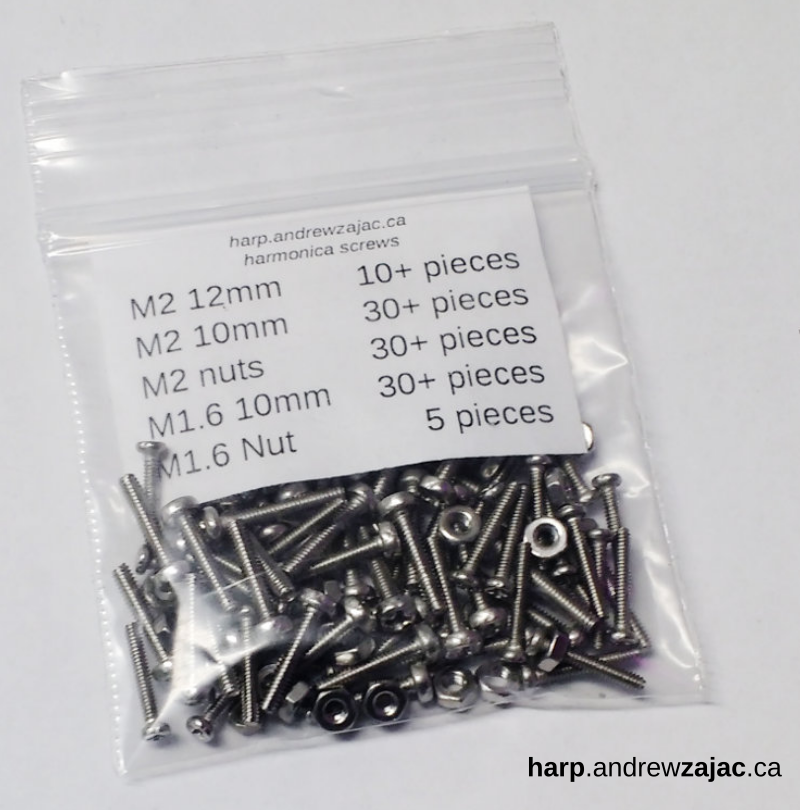
Keep these handy and you will never have to go looking around on your hands and knees for a renegade screw.
This pack contains every possible replacement screw you could need when working on the most popular diatonic harps.
This is a standard assortment of harmonica screws for Hohner, Seydel, Suzuki and Lee Oskar.
Looking for Pozidriv? It doesn't matter what type of head is used: Slotted, Phillips, Pozidriv, etc... They all work. What's important to match is the size and length of the screw. I chose Phillips head screws because Pozidriv screwdrivers are harder to find. It makes life simple!
High-quality screws for any brand of harmonica. These screws are made from A2 Stainless Steel (304)
These screws can self-tap factory-new reed plates.
____________________
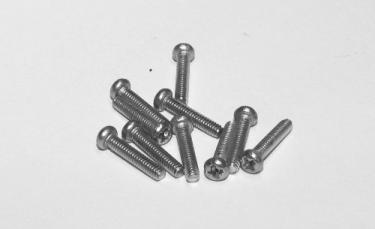
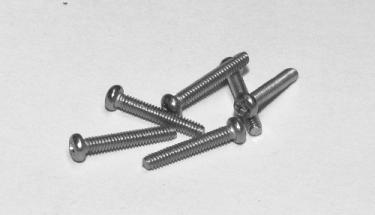
- M2 10 mm screw - as used in the Classic Hohner Special 20 harmonica, Suzuki harmonicas, Lee Oskar harps, Marine Band converted to screws and my custom harmonicas.
____________________
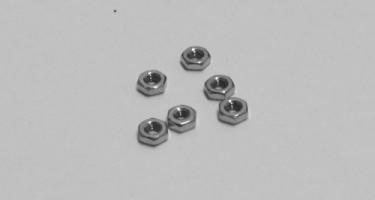
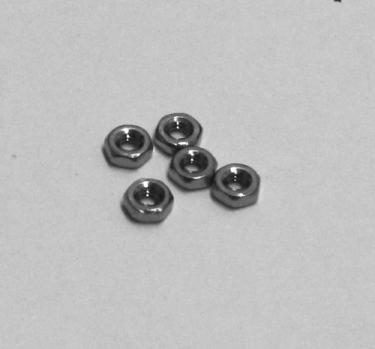
- M2 Nuts - Use a nut and bolt to hold cover plates. Can also be used to bolt the reed plates to the comb instead of tapping the reed plate.
Did you accidentally strip the reed plate thread? No problem. Use a nut instead.
____________________
- M1.6 10 mm screw - as used in Hohner Crossover, Golden Melody, MS series and Seydel harmonicas. These are also used in the new line of Special 20 and Rocket harmonicas from Hohner.
____________________
- M2 12 mm screw - Perfect for cover plates on Hohner Special 20, Marine Band 364/365 or other harps with thicker combs.
____________________
- M1.6 Nuts - Use a nut and bolt to hold cover plates. Can also be used to bolt the reed plates to the comb instead of tapping the reed plate
Alcohol will wear down the tips of the tines of my combs but there are a few other reasons not to use it as part of harmonica maintenance.
I spent a big part of my career working in an operating room or ICU as a Respiratory Therapist and Clinical Perfusionist. I'm familiar with asepsis and sterile techniques. Here's my take on cleaning versus trying to kill microorganisms in the harmonica.
While 70 per cent alcohol is effective at cleaning off thermometers and stethoscopes, it is not idea for disinfecting a harmonica. Alcohol is very volatile and evaporates quickly - anything less than 70 per cent concentration will not be effective. And if sprayed as a mist (for example, Mi-T-Mist), you cannot assure that a high enough concentration of alcohol will actually reach the target since most of it will evaporate in transit.
There are too many nooks and crannies in a harmonica for alcohol to work. Not to mention a porous comb will shelter microorganisms from some products.
Alcohol will not kill organisms caught under debris so to reach all the bugs, each piece of the harp must be cleaned first. But if you clean the harp well, there is no real need to sterilize.
I only think about sterilizing a harp if I am worried about a specific pathogen, example someone with active cold sores played my harp.
Instead, I recommend soap and water. My combs do not swell. You can dunk the whole harp with my comb under soapy water and slosh it around. Rinse it out, tap out the excess water and let it dry. You can use a hair dryer to warm up the inside of the harp to dry it out faster.
If you need to disinfect in addition to cleaning, I recommend hydrogen peroxide. It is inexpensive, non-toxic and earth-friendly: it breaks down into oxygen and water.
Frustrated Player:I bought a new harp and the reeds are stiff.
Me:You find the reeds feel stiff? The major brands' reeds usually work very well. They may have a different feel, but they shouldn't be stiff. I think something else is going on.
Frustrated Player:It's the reeds. In fact it's mainly the 2 and 3 draw reeds. I tried gapping them but that only made it worse!
Me:Often when a harmonica is leaky, it feels just like the reed is stiff because we need to use a lot of effort to get it to play, but the real problem is that there's not a lot of air getting to the reed. The reeds are fine. But since we can't see what's going on as we play, the sensory feedback is the same as if the reed really was stiff.
I get the feeling the only thing the person is hearing are sounds that come from the adults in Charlie Brown:
"Waugh Waaugh WAAaa WAAAAaa...."
Frustrated Player:It's a (insert any and every Make/Model here). I read on the internet they are all stiff.
Me:I'm sure we can fix it.
Frustrated Player:Okay. Here. I forgot to mention, I tried embossing but that didn't work.
Me:Really?
Frustrated Player:Embossing didn't do anything so I just kept embossing until the reed got stuck. I freed it up but now it buzzes. And it's still stiff. It's the reeds on this (insert any and every Make/Model here)!
I take the harp apart and we check the flatness of the reed plates and comb. We either correct or replace the comb. We flatten the draw reed plate using a flat surface and some sandpaper and we straighten the blow plate using the F tool™ and French Tuner™. The whole process takes about five minutes.
I carefully eliminate any dust particles from the inside of the harp and reassemble it. I deal with the over-embossing and zealous gapping. I hand the harp back to the disgruntled player.
Formerly Frustrated Player:Wow! This person is visibly pleased.
Me:Are the reeds still stiff?
Formerly Frustrated Player:Do-Diggetty Wah Wahh. (Can't talk with the harp in mouth except to say "thank you!")
I'm not making this up. This happens to me *all the time*.
It hadn't occurred to me to make a video showing the process of installing a new comb until now because it's just so straightforward. But Rockin Ron pointed out to me that he gets asked that question quite a bit and it would be a good idea to do one.
I'm very thankful for my dealers because they help me so much. Thanks Ron!
This kit provides what you need to work on harps anywhere.
Use this kit to:
-Adjust reed shape and gap
-Fix tuning troubles without having to take apart your harp!
-Fix Reed Centering
-Replace lost screws
Here are a few thoughts on overblows and harmonicas. These ideas are relevant to both setting up and playing overblows on the diatonic harmonica.
- Overblows, overdraws, overbends are just like regular bends. The same thing that causes a regular note to bend causes the note to overbend.
- Air flow makes the reeds move and resonance affects the frequency (pitch). This is basic to how the harmonica works.
- Resonance can make a reed stand still. Resonance is kinetic energy and it can greatly affect the frequency of a reed.
- Resonance has a strong effect on both reeds when regular bends are played. Regular bends are double reed bends and overblows are single reed bends - they have a different behavior and sound.
- Resonance has a weaker effect on the closing reed than the opening reed during an overblow. If you can't hold and overblow note, it's likely because the reed that's supposed to stand still is not standing still.
- There are several kinds of overblow. Which is your favorite?
- It’s technique, but it’s also the harp. You need technique to play overbends but you also need a harp that will respond to your playing.
"...Here's how you do it: Only emboss half the slot...."
Embossing is SO misunderstood.
Embossing decreases the amount of space between the reed and the slot. It's as simple as that!
Why do it?
- You want to improve response
- You want a little more volume
- You like a bright sound
Why would you not want to emboss?
- You don't like bright tone
Embossing doesn't fix anything!
Do not ever try to fix a problem with embossing. If a note doesn't play well, spending 30 seconds embossing won't help. And when you are not happy with the result and decide to emboss some more - this time with more force - you will probably overdo it and end up damaging the reed plate.
To fix a misbehaving reed, make the harp airtight and fix the shape of the reed. Once you have done that, you can try embossing to add a little extra juice.
Embossing isn't just for overblows!
It would be a challenge to set up a harp for overblows without embossing, but that doesn't mean you can't take advantage of the benefits of embossing on a general-purpose harmonica.
Also, in of itself, embossing doesn't make your harp play overblows any easier. Not to any useful degree anyway... Again, the shape of the reeds counts for a whole lot more.
The Dark side of embossing
Embossing can cause problems. If you overdo it, your reeds will start to sound thin and the high overtones will become more present. As you continue to emboss, you will start to hear the reeds buzz. If you continue further, you will make the reed seize.
None of this causes permanent damage; you can undo embossing. But if you force the reed while trying to fix the damage, you can wreck your harp.
Embossing a harp is a job that takes a few minutes. If you are spending more time fixing the damage than you are spending time embossing, you are doing something wrong! I'm not saying you should rush your work but if you are spending hours embossing, you should probably re-think your process.
Less is more: Get the advantages without the drawbacks!
Gentle embossing can offer you a lot of the advantages of embossing while avoiding 99 per cent of the drawbacks.
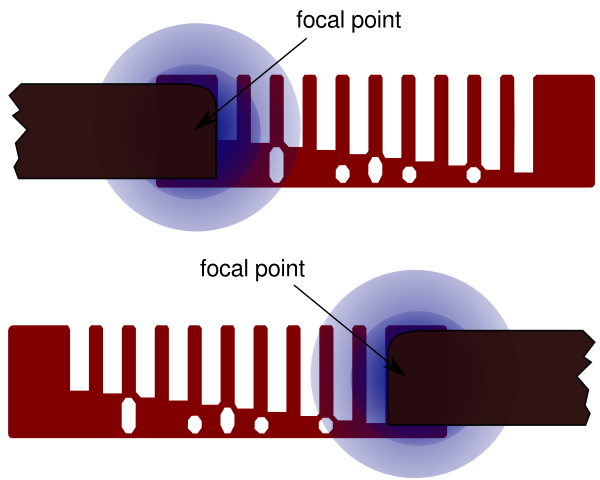
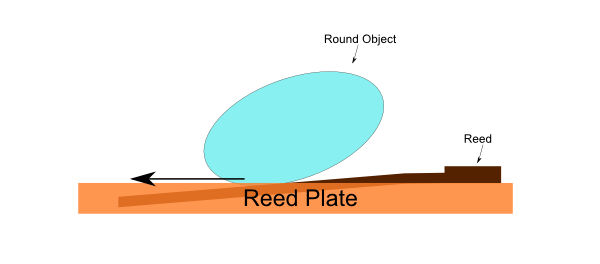
Here's how you do it: Only emboss half the slot.
Find a round metal object like a 10mm chrome-plated socket driver, or the tip of one of my pin vises.
Hold the object halfway down the slot and press down. Press about as hard as you press a touch screen phone. Move the round object towards the free end of the slot (towards the reed tip).
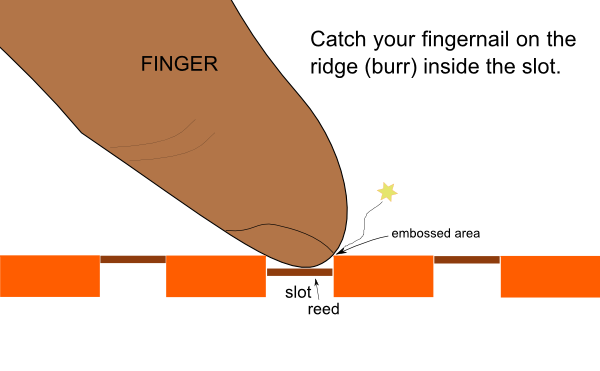
You won't be able to see the little ridge you have created on the inside of the slot just by looking at the reed plate. Feel the inside of the slot with your fingernail. Pick at the side to see if you have created a little ridge on the inside of the slot. If you feel nothing run the round object down the slot again, this time with a little more force.
Do it until you have used just enough force to create a ridge (or burr) on the inside of the slot. Repeat the process on all the other slots one at a time starting from the halfway point and going to the free end.
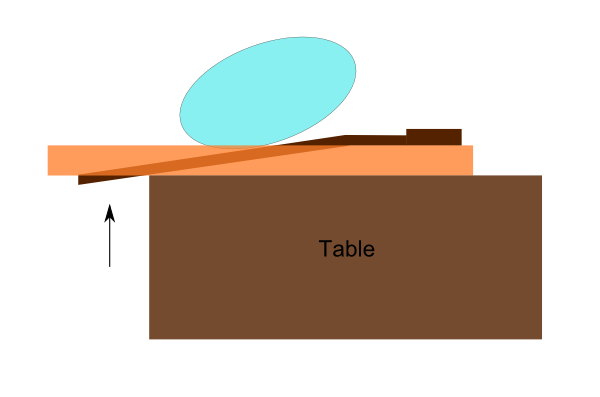
On the weighted low reeds, you may need to position the reed plate over the edge of a table so that the tip of the reed can "peek" out the bottom of the slot as you move your round tool towards the tip.
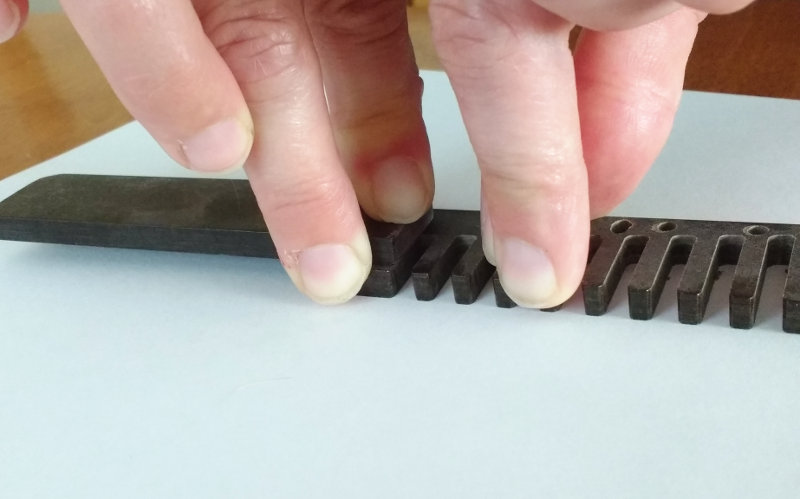
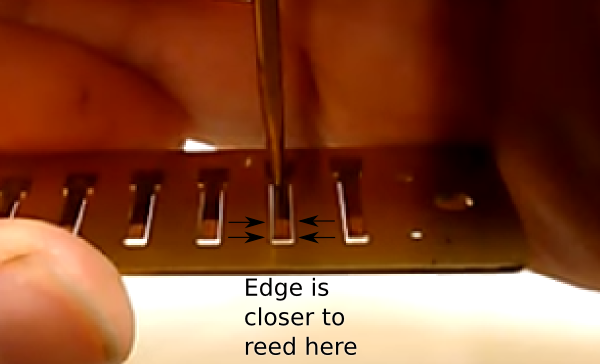
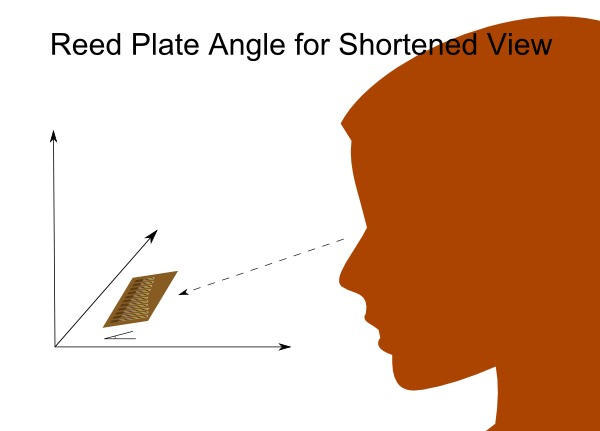
Next, check your work. Use this hand position and angle the reed plate to look through the slots:
The shortened view of the slot is a low-tech way to zoom in and see how close the reed is to the sides of the slot. No extra equipment required (Microscope, Light Table, etc...)
Push the tip of the reed through the slot while you are looking to see if the reed touches any part of the sides. You'll also see if the reed is off-center as you do this. If you embossed with gentle finger pressure you should still have lots of room on either side of the slot.
If you overdid it in some areas, you will see it using this view. You may also notice the reed has a prickly/buzzy sound or maybe it doesn't even plink? To fix it, push the ridge of metal back. Use gentle force in the areas you need to target so that you don't completely undo your work.
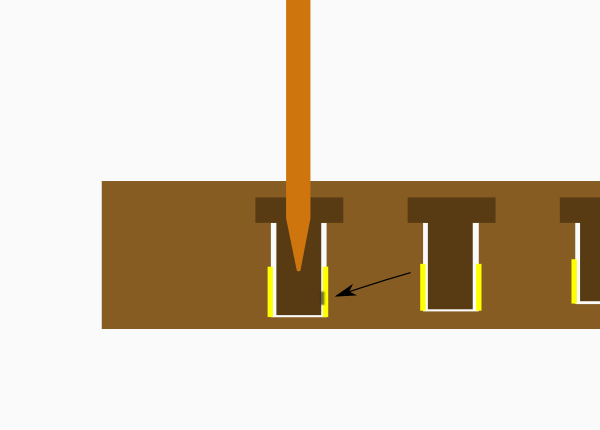
Use a round piece of metal like a reed tool or a safety pin.
Since you only worked on the front half of the slot, you should be able to get your tool in position from the under side of the slot. The reed won't be in your way, it will simply be pushed up a little. Plink the reed a few times and re-check.
Now, put the harp back together and play it! You should notice more responsiveness and louder sound.
The reed shape, gap and tuning should be unchanged after embossing this way because we only worked on the free end of the slot. Not bad for a few minute's work! This method is a real time-saver!
If you are interested in embossing to the fullest possible limits, try Full Slot Embossing.